🚚
Use code
FLAT10
to get AED 10 OFF
on orders above AED 250.
🚚
Use code
FLAT10
to get AED 10 OFF
on orders above AED 250.
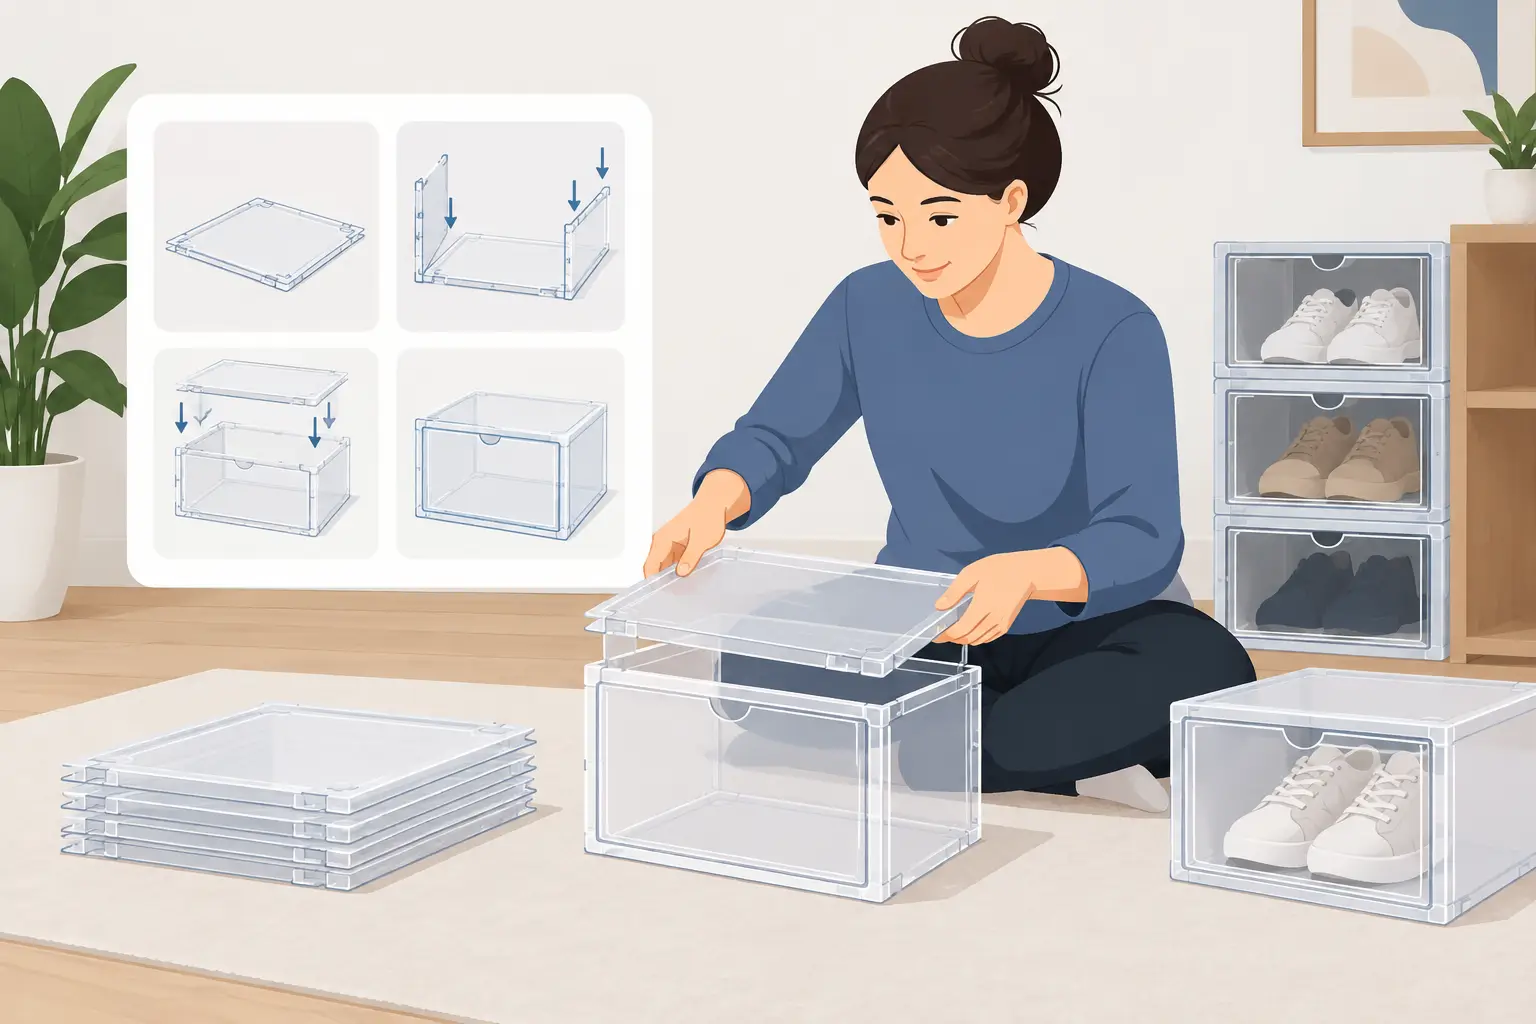
A crystal-clear shoe box should make your sneaker wall look sharp, not leave you fighting loose panels and a crooked door. Learning how to assemble shoe storage boxes properly takes only a few minutes per box, but the result matters: stable stacks, cleaner lines, and dependable protection for the kicks you actually care about.
Whether you are setting up your first display or expanding a growing collection, slow down for the first box. Once you understand how the panels lock together, the rest become quick, repeatable, and satisfying to build.
Clear a flat workspace before opening the packaging. A dining table, clean floor, or wide desk works well. Avoid building directly on rough concrete, dusty surfaces, or thick carpet, where a panel can pick up marks or sit unevenly during assembly.
Unpack the pieces and remove any protective film if your box includes it. Acrylic panels can look cloudy or scratched while the film is still on, so check both sides carefully. Peel it slowly from a corner instead of pulling hard across the panel. This helps prevent static, fingerprints, and bent edges.
Lay out the base, side panels, top panel, back panel, front door, and connectors in matching groups. The exact configuration can vary by model, but most clear sneaker display boxes use the same logic: the base carries the weight, the sides create the frame, and the door gives you easy access without unstacking your collection.
Before you start clicking pieces together, wipe the panels with a clean microfiber cloth. It is much easier to remove dust before the box is assembled than to reach into corners afterward. If your sneakers need attention too, clean and fully dry them before display. Trapping moisture, dust, or odor inside a closed box defeats the purpose of premium storage.
Place the base panel flat on your work surface with the connection points facing up. Identify the back edge by checking where the rear panel will sit. Some boxes use raised tabs, while others have small slots or interlocking corners.
Press the back panel into place first. Hold it upright with one hand and apply even pressure near the connection points with the other. Do not force the center of an acrylic panel. Pressing close to each joint reduces flexing and helps the pieces seat cleanly.
You should feel or hear a controlled click when the panel locks in. If a corner will not connect, stop and check orientation. Turning a panel around is usually the fix. Forcing a mismatched edge can stress the acrylic or damage a connector.
Fit one side panel into the base and back panel, then repeat on the other side. Work from the bottom connection upward. Make sure each corner is fully seated before moving to the next one.
This is where many stacks end up looking uneven. A side panel that seems connected but is not fully clicked into the base can create a tiny gap. That gap may not look serious on one box, but it becomes obvious once several boxes are stacked. Run your fingers along the lower seams. They should feel flush, without lifted corners or wobble.
If your storage box has separate plastic connectors, install them only where instructed and push them straight in. Twisting them can cause misalignment. A snug fit is what gives a stacked sneaker display its sturdy, clean look.
Once the sides and back are stable, line up the top panel. Start by fitting the rear corners, then press down along each side until every connection is engaged. Use both hands and distribute pressure rather than pushing down hard in one spot.
Check the box from the front and side. The panels should create a square shape, with no outward bowing. If the top does not sit flat, one of the side or back connections is likely not seated all the way. Take the top off, correct the loose joint, and try again. It is faster than trying to fix a leaning stack later.
The front door is the part you will use most, so give it a proper test before loading your sneakers. Align the door hinges, tabs, or pins with the designated points on the frame. Depending on the design, the door may slide into place from the side or snap into its hinge openings.
Open and close it a few times. It should move smoothly and close flush against the frame. If it rubs, catches, or sits at an angle, inspect the side panels and top panel first. The door is often fine – the box frame is what needs adjustment.
Do not stack boxes until every door closes correctly. A door that is even slightly out of alignment can become harder to open once weight is added above it.
Put your sneakers in heel-first or toe-first based on how you want the display to look. Toe-forward placement often creates a cleaner sneaker-wall effect because the silhouette, toe box, and colorway are visible immediately. For pairs with a standout heel detail, a heel-forward layout can make more sense.
Leave a little space around the shoe. Do not cram high-tops, bulky runners, or pairs with oversized laces into a box that is too small. Pressure against the walls can distort the presentation and make the door harder to close. It can also crease soft materials over time.
For a pair that has just been worn, let it air out and dry before putting it away. Dubai heat, workouts, rainy days, and long hours on foot can leave moisture inside a shoe even when the upper feels dry. A clean, dry pair stored in a clear box stays fresher and is ready to wear when the fit calls for it.
If you keep original inserts, consider using them for pairs that lose shape easily. They can help preserve the toe box of knit, leather, and premium lifestyle sneakers. Just avoid overstuffing the shoe, which can stretch the collar or create unnecessary pressure.
A single box is simple. A full sneaker display needs a little planning. Start stacking from the floor or from a level shelf, and build upward only on a stable surface. Check that each box is fully closed and aligned before placing another one on top.
Keep heavy pairs, such as chunky basketball shoes or boots, on lower rows. Lighter low-tops can go higher. This is not only about weight. Reaching for your most-worn pairs should feel easy, without pulling at a tall, unstable column.
For the cleanest visual result, line up doors in the same direction and keep a consistent sneaker orientation throughout each row. You can organize by color, brand, rotation, or occasion. There is no single right system. A collector may prefer color-blocked shelves, while someone building a daily rotation may want gym, work, and weekend pairs grouped separately.
Wipe the outside of your clear boxes regularly with a soft microfiber cloth. Avoid abrasive towels, harsh household sprays, or rough sponges that can dull transparent surfaces. A little routine care keeps the display looking premium instead of hazy.
If a panel keeps popping out, it is usually upside down, reversed, or being attached before the adjoining panel is fully seated. Take it apart gently and rebuild that section in order rather than pushing harder.
If the whole box rocks on a flat surface, inspect the base corners for incomplete connections. Press each lower joint until it sits flush. If the door will not close, check the frame for a top panel or side panel that is slightly lifted.
Cloudy panels are often still covered by a thin protective layer. Look closely at the corners and peel from there. If you see fingerprints after assembly, use a dry microfiber cloth first. Less handling during setup means less cleanup at the end.
Sneakkool display boxes are built for sneaker owners who want storage to look as good as the collection inside it. Take a moment to square every panel, test every door, and place each pair with intention. Your kicks deserve more than a pile in the closet.
No account yet?
Create an Account